Support our educational content for free when you purchase through links on our site. Learn more

An accessible raised garden bed should be designed around the gardener—not around a universal “accessible” height. Start by measuring the person’s comfortable reach and working position, then plan knee clearance, route width, turning space, surface, water access, and maintenance. A cardboard or temporary mock-up is more reliable than choosing dimensions from a product label.
This guide separates individual usability decisions from accessible-route requirements. The measurements in the 2010 ADA Standards apply to accessible routes and turning spaces in covered facilities; they do not prescribe one raised-bed height for every gardener or establish that a consumer garden product is “ADA compliant.” Confirm which accessibility and building requirements apply to your site with the relevant local authority.
Key takeaways
- Prototype first. Test height, reach, knee clearance, and task position with the intended gardener before construction.
- Design the route and bed together. An appropriate bed is not useful if the path, gate, hose, tools, or turning area remain barriers.
- Avoid universal height claims. Wheelchairs, bodies, reach, postures, and preferred tasks differ.
- Keep the planting zone within comfortable reach. A narrower bed or access from two sides is often safer than reaching across a wide bed.
- Plan recurring work. Watering, soil replacement, pest checks, and path maintenance need accessible methods too.
A user-centered design process
Begin with the people and tasks. Ask who will plant, weed, water, harvest, move soil, and maintain the route. Observe or simulate the working position for each priority task. A gardener may be comfortable reaching forward for a light harvest but need a different position to move soil or operate a hose.
- Choose the working position. Seated facing the bed, seated alongside it, standing, or alternating positions.
- Measure comfortable reach. Measure an ordinary, repeatable reach rather than the maximum stretch possible once.
- Mock up the edge and soil line. Use a table, boxes, or cardboard to test height, forearm support, knee space, and access to the back of the planting area.
- Simulate the work. Practice watering, digging, transplanting, and harvesting motions.
- Test the whole route. Move from the entrance to the bed, water, tool storage, compost, seating, and exit.
Record the tested dimensions. If several people will share the bed, look for a design that offers more than one usable work position—for example, sections at different heights or a mix of elevated and ground-supported beds.
Bed height and knee clearance
There is no single correct raised-bed height for wheelchair users, seated gardeners, children, or people who prefer to stand. The useful height depends on seat height, arm reach, trunk movement, footrest position, the thickness of the planter, and the depth required by the crops.
For a seated approach, check more than the top height:
- Can knees and footrests move under or close enough to the planting area?
- Does the planter structure reduce usable knee space?
- Can the gardener see and reach the soil without leaning beyond a stable position?
- Is the edge comfortable for forearm support, or does it create pressure?
- Can water drain without dripping into the knee and foot space?
For a side approach, a recess may be unnecessary, but the planting zone must remain within comfortable lateral reach. For standing users, test the height while performing the actual tasks; a soil line that feels comfortable for harvesting may be too high for digging.
Width and reach
Bed width should follow tested reach. When a bed is usable from one side, its planting depth should not exceed the intended gardener’s comfortable forward reach. When both long sides are accessible, a wider bed may work because each half can be tended from its nearest side.
Use a temporary strip of cardboard or paper to mark the proposed planting area. Place small objects at the near edge, middle, corners, and far edge, then test picking them up while maintaining a stable position. Reduce the width or add a second access side wherever the test requires overreaching.
Avoid filling the back of a deep bed with crops that need frequent attention. Put regularly harvested herbs and greens in the easiest reach zone, with lower-maintenance plants only where they remain safely accessible.
Routes, surfaces, and turning space
For covered facilities, the 2010 ADA Standards specify a 36-inch minimum clear width for an accessible route in Section 403, subject to the standard’s exceptions and passing-space requirements. Section 304 describes circular and T-shaped turning spaces, including a 60-inch-diameter circular space. These are route and maneuvering requirements—not recommended bed dimensions.
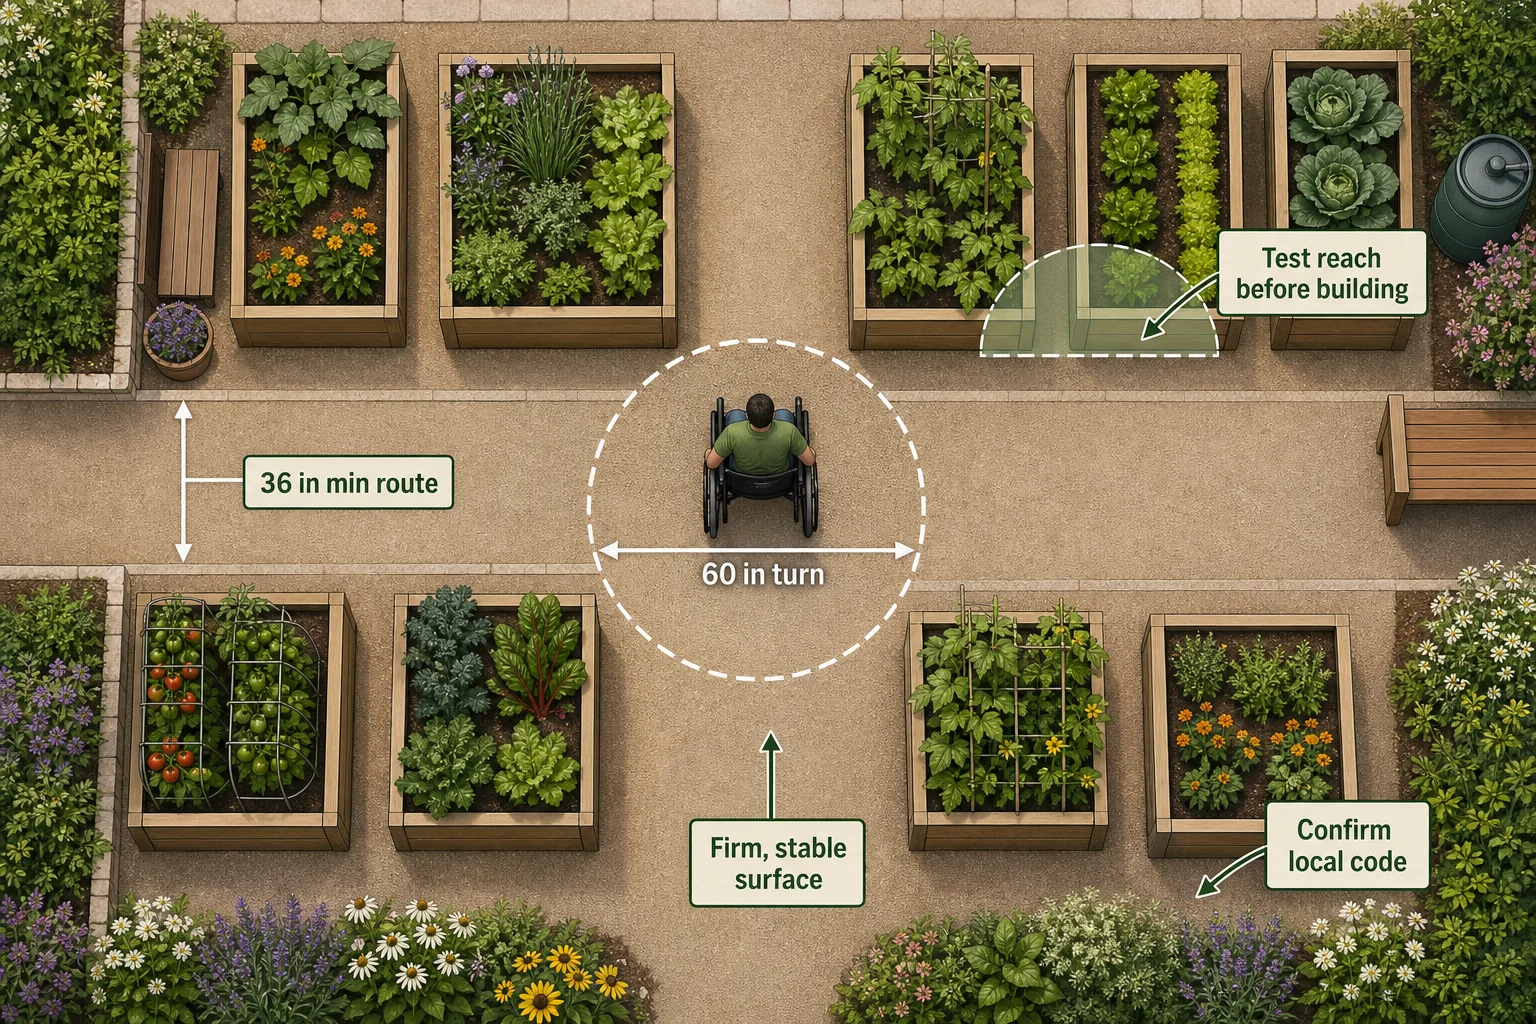
Keep routes firm, stable, slip resistant, and free of protruding hoses, edging, tools, and changes in level. Loose material may be difficult for some wheels or walkers even when it looks level. Evaluate gates, latches, thresholds, slopes, drainage, and the space needed to approach and leave each bed.
Raised-bed styles compared
| Bed style | Potential advantage | Design question |
|---|---|---|
| Tabletop or elevated planter | Can provide a close seated or standing approach | Is there adequate knee and foot clearance without sacrificing soil depth? |
| Ground-supported raised bed | Stable and available in many shapes | Can the gardener approach closely enough and reach the center? |
| U- or L-shaped bed | Offers more edge and several work positions | Are the inside corners and route wide enough to maneuver? |
| Multi-height bed | Can serve people with different preferred positions | Are transitions stable, visible, and reachable? |
| Container grouping | Easy to rearrange after testing | Will small containers remain watered and stable? |
| Vertical or trellised system | Moves some crops into easier reach | Can every planting level be watered and maintained safely? |
A practical video demonstration
The following video from Graying With Grace provides a visual overview of wheelchair-accessible raised-bed considerations. Treat it as a design demonstration, then verify measurements with the intended gardener and the requirements that apply to the site.
Materials, drainage, and soil
Select materials for structural load, moisture exposure, local climate, maintenance, and the crops being grown. Avoid sharp edges, exposed fasteners, splinters, and surfaces that become dangerously hot. If treated wood or another manufactured material is proposed for a food garden, review current manufacturer information and local extension guidance rather than relying on a generic safety claim.
Elevated planters need a drainage path that does not create puddles or slippery surfaces. They also need enough growing depth for the selected crops without becoming too heavy or reducing knee space. Use soil or growing media appropriate for containers, and confirm that the support structure can carry the saturated load.
Where existing urban soil may be used, investigate the site’s history and seek qualified guidance on appropriate testing. The EPA’s urban-agriculture resources explain that previous use can shape soil concerns and that raised beds with verified soil, containers, or soil-free systems may be suitable alternatives in some situations.
Tools, watering, seating, and shade
Accessibility is an operating practice, not a one-time construction feature.
- Tools: Offer lightweight, long-handled, angled, or enlarged-grip options, but let each gardener test them. A specialized tool is only helpful if it fits the user and task.
- Water: Put controls within usable reach. Consider light hoses, short hose runs, drip irrigation, timers, or filled watering containers that do not require carrying from a distant tap.
- Storage: Store frequently used tools between knee and shoulder height when possible, with labels that are easy to see and understand.
- Seating: Provide stable seating with clear adjacent space so people can rest or transfer without blocking the route.
- Shade and timing: Provide shaded rest options and plan tasks for appropriate weather conditions.
- Communication: Use readable signs and more than one way to share schedules, rules, and task instructions.
Planning an inclusive community garden
Include intended users in site walks, mock-up tests, and final reviews. A technically dimensioned bed can still fail if the gate is difficult, the tools are locked out of reach, or the watering system requires dragging a heavy hose.
Map the complete experience from arrival to departure:
- Arrival, parking, or transit connection
- Entrance and gate hardware
- Route to plots, seating, water, storage, compost, and restroom if provided
- Bed approach, turning, reach, and task position
- Emergency contact and assistance process
Offer tasks at different heights and effort levels, and make role selection voluntary. For broader site planning, see our guide to urban gardening models and our overview of how community gardens work.
Pre-build checklist
- The intended gardeners participated in the design review.
- Working position, comfortable reach, and knee or foot clearance were tested with a mock-up.
- The bed can be approached without an unstable stretch or blocked footrest.
- The route, turning area, gate, surface, slope, and drainage were evaluated.
- Applicable local accessibility, building, land-use, and utility requirements were confirmed.
- Materials, saturated weight, drainage, and soil depth suit the structure and crops.
- Water, tools, seating, shade, and storage are usable.
- Recurring maintenance has named owners and backups.
- The design can be adjusted after real use.
What our team has learned from accessible gardens
Ever wondered why a simple raised box can unlock a world of gardening joy for so many? It’s not magic, friends, it’s thoughtful design! At Community Gardening™, we’ve seen firsthand how accessible raised garden beds transform lives, turning once-impossible dreams of growing into vibrant realities.
We treat “transform” as a practitioner observation about reduced barriers and renewed participation, not as a guaranteed clinical or functional outcome.
We often talk about the practical advantages of accessible raised garden beds, but let’s be real: the benefits stretch far beyond simply reaching a tomato plant. At Community Gardening™, we’ve witnessed the incredible ripple effect these gardens have on individuals and entire communities. It’s not just about physical accessibility; it’s about nurturing the soul, fostering connections, and promoting holistic well-being.
Beyond the individual, accessible raised beds are powerful catalysts for community garden benefits. They create inviting spaces where people of all ages and abilities can come together, share knowledge, and build friendships. We’ve seen shy individuals blossom as they share their harvest, and intergenerational bonds form over a shared love of growing. These gardens become vibrant hubs, fostering a sense of belonging and collective achievement. Want to learn more about how community gardens enrich lives? Check out our insights on the Benefits of Community Gardens.
Those social observations are one reason the design process includes task choice and shared work. The experience does not imply that every accessible bed produces the same social or health result.
Alright, so you’re convinced that an accessible raised bed is the way to go – fantastic! But before you grab your hammer and nails (or your credit card!), let’s talk design. This isn’t just about throwing some wood together; it’s about creating a space that truly works for you and your specific needs. At Community Gardening™, we’ve learned through countless projects that thoughtful planning is the secret sauce to a successful, joyful, and truly accessible garden.
Community Gardening™ Pro Tip: Don’t just guess! Grab a measuring tape and sit in your wheelchair or on your favorite garden stool. Mimic gardening motions and find the height that feels most natural and comfortable for your body.
Our Anecdote: One of our community members, Martha, initially built a 36-inch wide bed accessible from both sides. She quickly realized that even with two-sided access, reaching the very center was a stretch for her. We helped her divide it into two narrower beds with a small path in between, and now she can comfortably tend every single plant! It’s a great reminder that personal comfort is paramount.
At Community Gardening™, we’ve seen firsthand how a thoughtfully designed raised bed can transform a challenging activity into a source of immense joy. We talked about Martha, who initially struggled with a wider bed, only to find renewed enthusiasm when we helped her adapt it to her specific reach. These personal stories underscore our core belief: gardening should be for everyone, regardless of age or physical ability.
Martha’s experience is our clearest reminder that a nominal width is not the same as usable reach. The current design guidance preserves that lesson: mock up the bed, test real tasks, and adjust before permanent construction.
Our accessible-gardening video library
In our This Old House video, landscape contractor Roger Cook demonstrates a wheelchair-accessible raised-bed build. We use that demonstration as construction context while still requiring the dimensions to be tested with the intended gardener.
Our Placer Resource Conservation District video explains the goals and construction sequence for an accessible raised bed. It complements the article’s route and reach guidance without turning one bed plan into a universal standard.
In our chronic-pain gardening video, the Cottage Peach team centers barriers that may not be visible and shows why task effort, posture, and pacing matter alongside nominal dimensions.
In our Christopher & Dana Reeve Foundation video, mobileWOMEN.org founder Wendy Crawford demonstrates planting from her own gardening perspective, including a practical way to handle seeds. Her contribution keeps the design discussion connected to real tasks.
Our Yard Coach video expands the lens from the bed to accessible landscaping for wheelchair users and people with limited mobility. That perspective reinforces the need to plan routes, turning, controls, seating, and maintenance as one system.
Our Oklahoma Gardening video covers raised-bed construction, soil preparation, planting, and accessibility together. We use it to show how bed geometry and the growing system affect one another during actual use.
Frequently asked questions
What height should an accessible raised garden bed be?
Choose the height through a user-specific mock-up. Seat height, reach, footrests, knee clearance, working posture, planter thickness, and crop depth all affect the result. There is no single height that makes a bed accessible to everyone.
Can a raised garden bed be called ADA compliant?
The ADA Standards address accessible elements and spaces in covered facilities, including routes and turning space; they do not provide a universal certification for consumer garden beds. Evaluate the entire site and consult the relevant authority or a qualified accessibility professional about requirements that apply to the project.
How wide should the bed be?
Make the planting zone no deeper than the intended gardener’s comfortable reach from each usable side. Test the center and corners with a mock-up. If reaching is unstable or strenuous, narrow the bed or add another usable approach.
What path material is best?
The route should be firm, stable, slip resistant, well drained, and maintainable. The best material depends on climate, slope, budget, and applicable requirements. Test whether wheels, walkers, and feet can use the finished surface comfortably.
Can an existing raised bed be adapted?
Often, yes. Possible improvements include narrowing the planting zone, adding a close approach, creating knee space, improving the route, moving controls and tools, adding seating, or converting one section to an elevated planter. Test each modification with its intended users.
References
- U.S. Department of Justice: 2010 ADA Standards for Accessible Design
- U.S. Access Board: Guide to the ADA Accessibility Standards, Chapter 4
- U.S. Environmental Protection Agency: Urban Agriculture
- U.S. Environmental Protection Agency: Steps to Creating a Community Garden or Expanding Urban Agriculture on a Brownfields Site